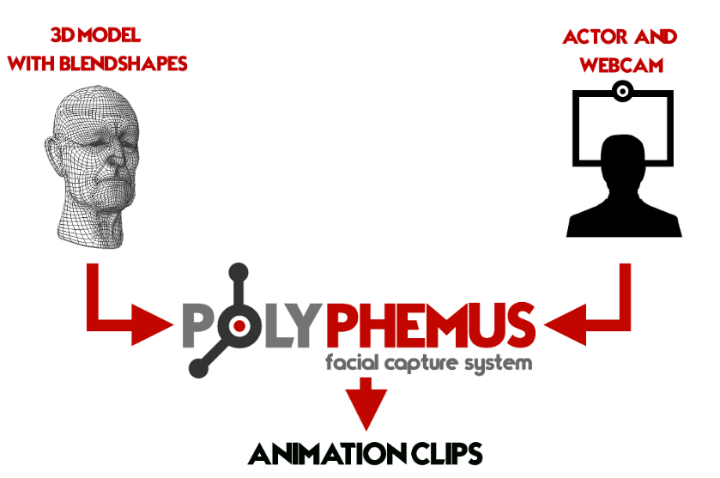
A computer* with a connected webcam or a laptop with integrated webcam.
*For a good capture quality is recommended a mid-range to high-end computer ( i.e. GeForce GTX 1060 - 7th Generation Intel® Core ) and an average quality -external or integrated- webcam ( it doesn't need to have HD/4K resolutions; a 30+ framerate, instead, is basically a mandatory requirement for a smooth capture.
Good light conditions: A natural light condition is recommended, even though it could still capture in low and high light conditions. Avoid frontal and/or back intense lights.
3D model implementing morph targets via blendshapes ( or “Shape Keys” ).
NB: This face capture system is based on facial landmark detection: Even if it can recognize a wide range of faces, it could have difficulties to detect some features in some kind of face and appearance.
Import the package in your project. It is recommended to import the assets under the default folder ( Assets/FaceTracker/ )
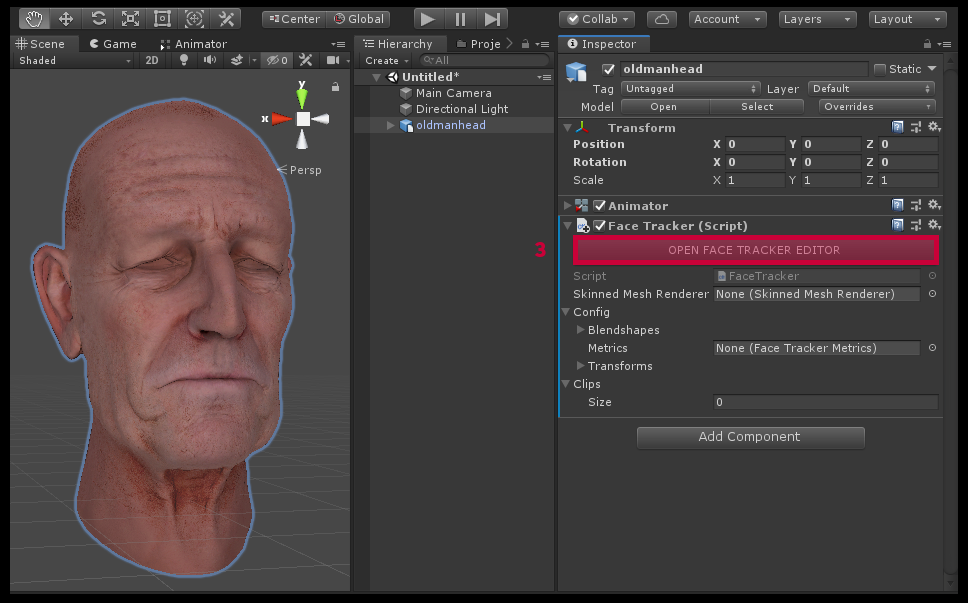
MODEL SETUP
Select the root of the 3D model that you want to animate.
Click on Add Component and select Face Tracker
Click on [OPEN FACE TRACKER EDITOR] button from the inspector to open the editor.
Alternatively, you can open the editor from Tools/Polyphemus option of main menu.
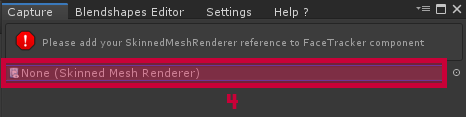
Select the SkinnedMeshRenderer that you want to animate.
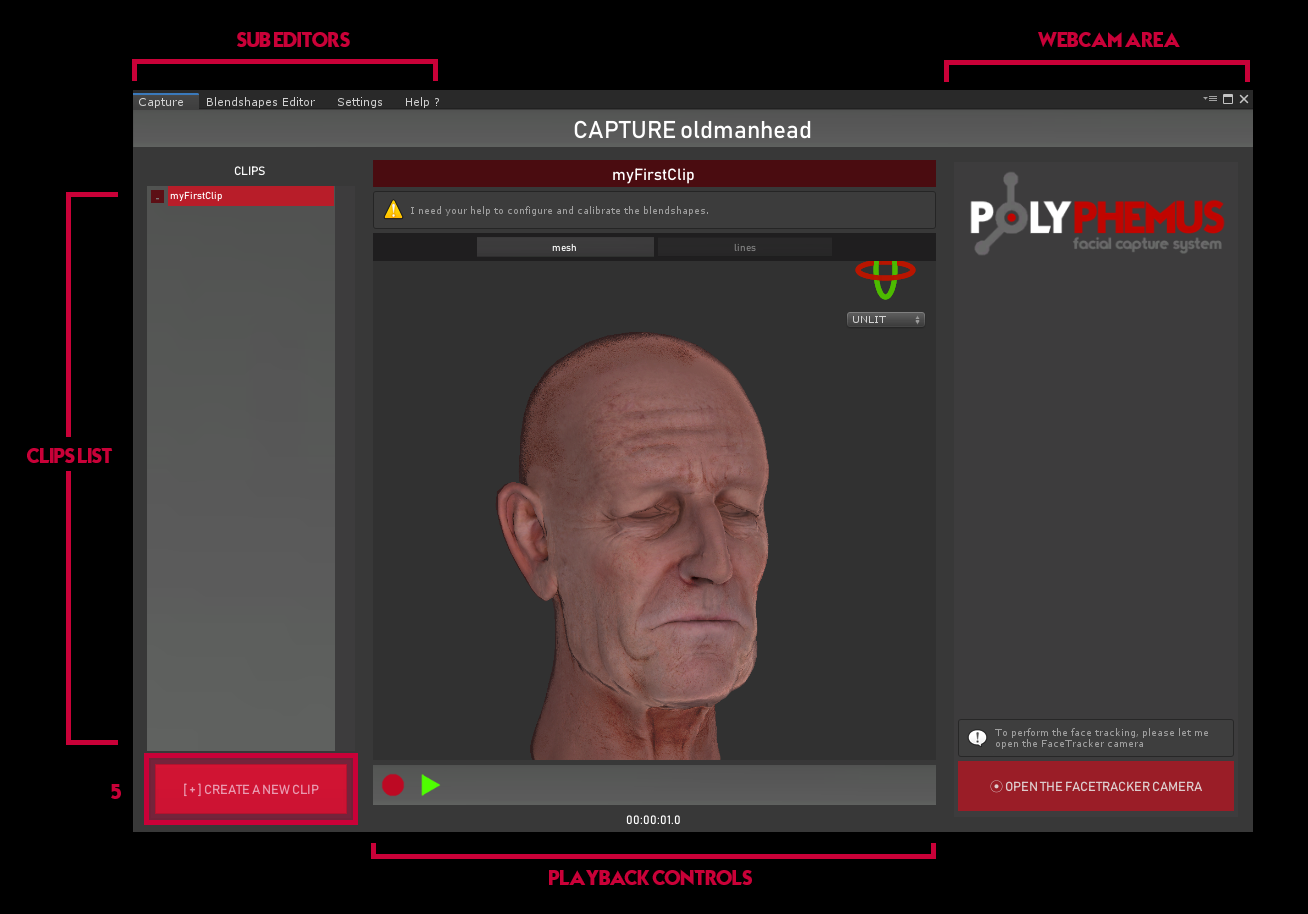
CAPTURE EDITOR
As first step, you can create a new CLIP ( that is a standard AnimationClip ), clicking on [[+] CREATE A NEW CLIP] button.
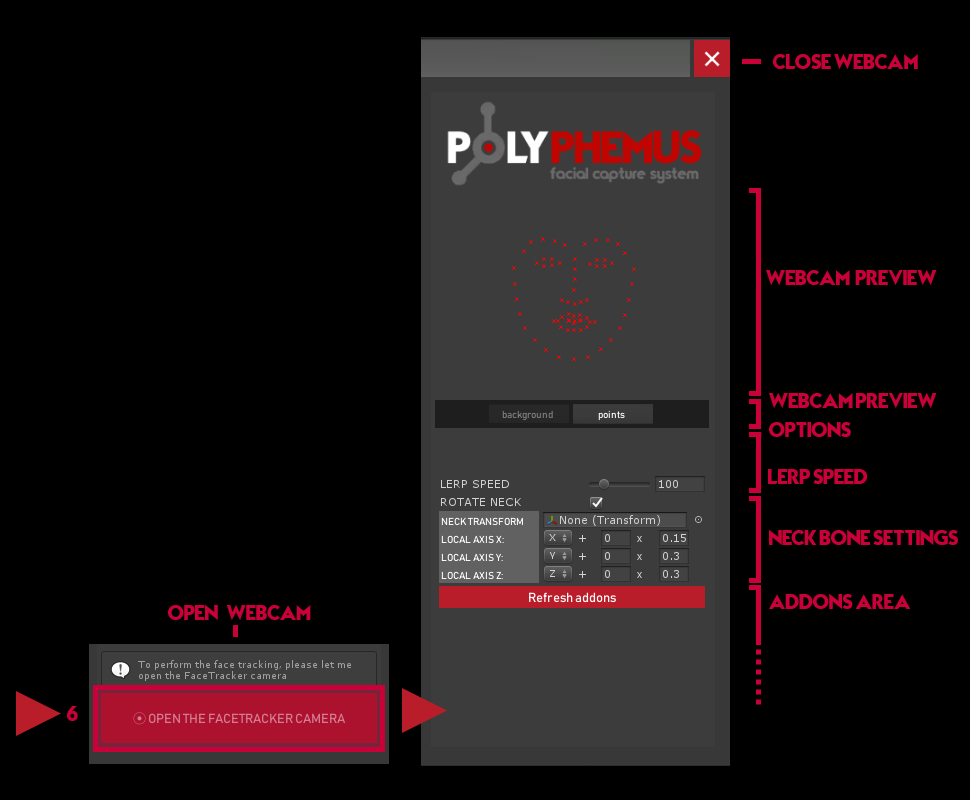
Open the WEBCAM clicking on [OPEN THE FACETRACKER CAMERA] button.
After few seconds, inside the WEBCAM PREVIEW area, you should see the red points on the captured facial landmarks.
NB: This face capture system is based on facial landmark detection: Even if it can recognize a wide range of faces, it could have difficulties to detect some features in some kind of face and appearance.
If you experience problems capturing the actor face, please try different light conditions and keep the face at 50cm / 1mt from the webcam.
On the top left area, you can find the sub-editors tabs: CAPTURE, BLENDSHAPE EDITOR, SETTINGS, HELP?
On the left area of CAPTURE sub-editor, you can find the list of CLIPS assigned to FaceTracker, component you are editing.
On the middle area of CAPTURE sub-editor, you can see a preview of the model, and find the playback controls to record or play the selected CLIP.
Press ● to begin recording the clip; Press ▶ to play it;
On the right area you can find the WEBCAM area.
You can decrease the LERP SPEED for a smoother but slower animation, or increase it for a faster but error-prone animation.
If your blendshapes tend to overlap each other, you can enable the NORMALIZE option, to keep the global sum of weights under the cap.
The RECORDING FRAME DT value is delta time between each recording frame. Keep it at 0 for smoother animations.
Under NECK BONE SETTINGS you can setup the neck bone ( and bind relative axis of bone to the capture rotation by a multiplier and an offset value ).
In ADDONS AREA you can configure addons. Please see ADDONS section.
BLENDSHAPES EDITOR
The WEBCAM is capturing the actor's facial landmarks, but the 3D MODEL is still not animating:
That's because FaceTracker don't know the meaning of each blendshape of 3D MODEL yet.
You'll have to bind it manually in the BLENDSHAPES EDITOR
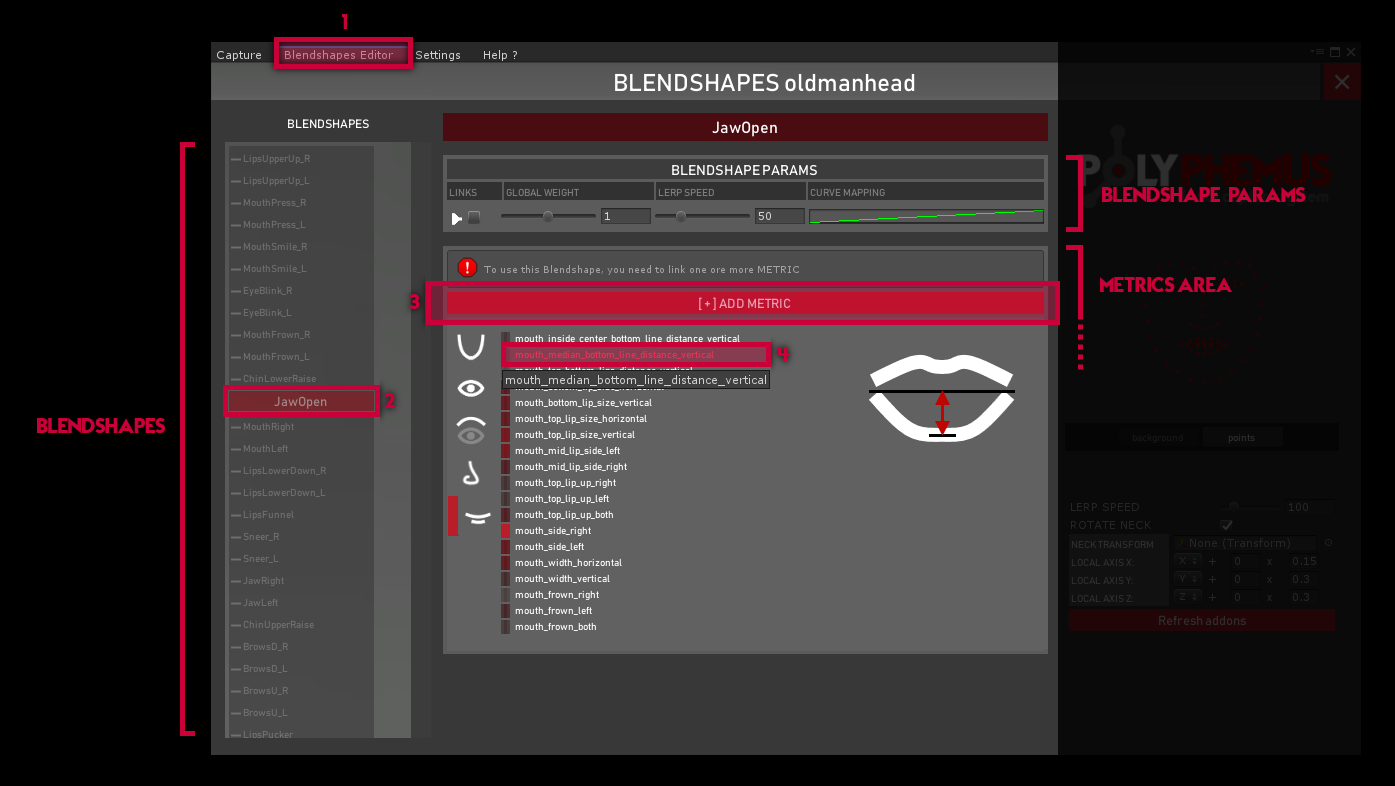
Open the BLENDSHAPES EDITOR
On the left area you can find the list of blendshapes included in the 3D MODEL.
Select one blendshape, for example the one that represent a mouth open pose ( i.e. JawOpen ).
On the middle area, you can setup the blendshape parameters:
The LINKS toggle allow you to link the value of this blendshape to the value of one (or more) other blendshapes.
The GLOBAL WEIGHT is the final multiplier applied to blendshape value: If you want to clamp or exagerate this blendshape, you can tweak this value.
The LERP SPEED influence the time needed to the blendshape to reach the target value.
The CURVE MAPPING allow you to change the mapping between the candidate final value of blendshape and the actual final value.
Each blendshape that you want to handle, needs to be linked to one or more METRICS.
A METRIC is a sort of facial feature value.
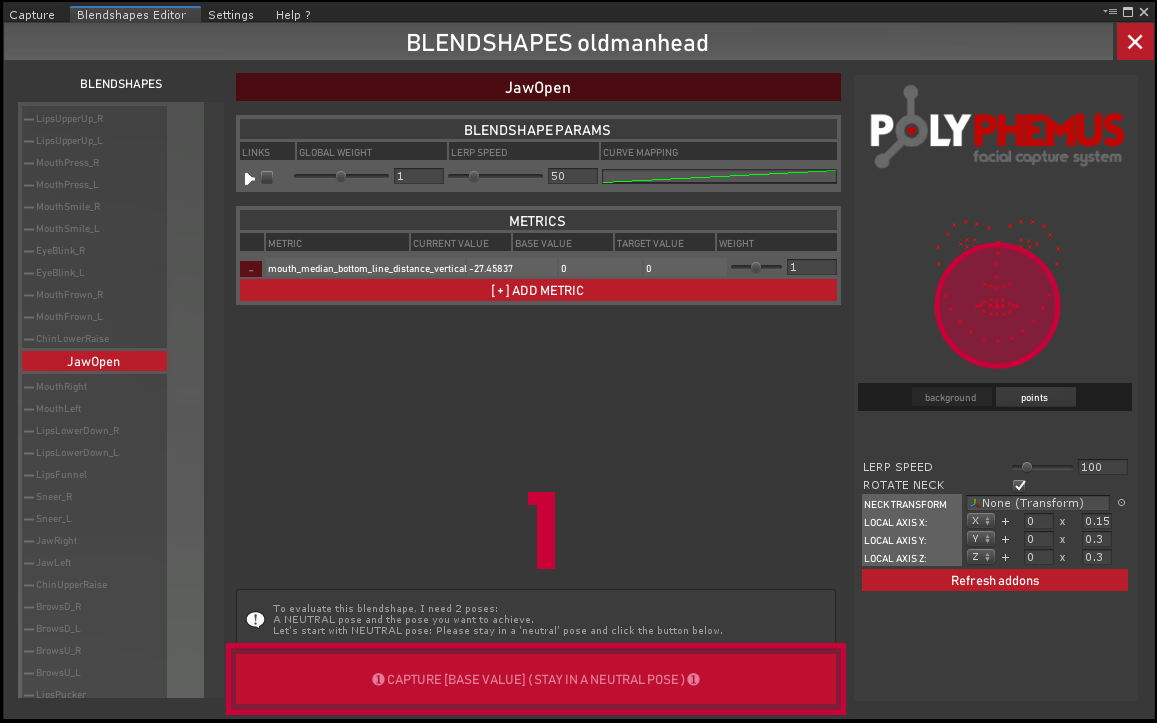
Click on [Add Metric] button: For a blendshape that represent a mouth open pose, you can use the "mouth_median_bottom_line_distance_vertical" metric, that's the distance between the median and the bottom line of the mouth.
Once you linked a METRIC, the system will need to know 2 informations to produce the final blendshape value: The BASE VALUE and the TARGET VALUE.
The BASE VALUE is the value that the METRIC will have when the blendshape value is equals to 0. So that's the value that the METRIC will have when the actor stay in a NEUTRAL POSE.
To set this value, the actor must stay in a neutral pose ( that mime the neutral pose of the 3D model with all the blendshapes values at 0 ), and press the
[ ❶ CAPTURE [BASE VALUE] ( STAY IN A NEUTRAL POSE ) ❶] button.
The TARGET VALUE, instead, is the value that the METRIC will have when the blendshape value is equals to 1 ( or 100 in Unity's range ).
So that's the value that the METRIC will have when the actor mime the TARGET POSE.
For example, if we are setting up a blendshape that represent a mouth open pose, the actor will have to open the mouth and press the
[ ❷ CAPTURE [TARGET VALUE] ( MIME THE TARGET POSE ) ❷] button.
After this 2 steps it's possible to test and tweak the blenshape response to the actor's face movements, using the blendshape parameters ( see above ).
If the result still not good also after tweaking blendshape params, is possible to re-take the NEUTRAL and the TARGET poses clicking on [ ❂ RESET ❂] button.
Polyphemus outputs standard AnimationClips that can be used in different scenarios, from the legacy Animation to the Animator controller, including the use of the Timeline and Playables.
It also comes with a simple API to control the playback inside the FaceTracker class. Here's a summary of main fields and methods:
Public Methods:
void Play ( AnimationClipclip , float speed = 1 )
Play the clip at the disired speed ( default = 1 ).
void Stop ()
Stop the current clip ( if it's playing ).
void Pause ()
Pause the current clip ( if it's playing ).
void Resume ( float speed = 1 )
Resume the current paused clip at the disired speed ( default = 1 ).
float GetBlendshapeValue ( string blendShapeName )
Get the normalized ( 0 - 1 ) value of blendshape by blendshape name.
float SetBlendshapeValue (string blendShapeName , float value )
Manually set the normalized ( 0 - 1 ) value of blendshape by blendshape name.
Properties:
bool isPlaying Return true if FaceTracker is playing a clip.
bool isPaused Return true if current AnimationClip is paused.
AnimationClipcurrentClip Return the current clip.
AnimationClip[] clips List of clips added with this FaceTracker.
Properties [UPDATED ONLY DURING THE IN-EDITOR CAPTURE]:
Vector2[] points Return the array containing the face landmarks points.
FaceTrackerConfigconfig Return configuration / editor data of this FaceTracker
CLASS: FaceTrackerConfig ( FaceTrackerConfig.cs )
The FaceTrackerConfig class contains the FaceTracker configuration data and, during the recording, will contains recorded values.
You should access to the FaceTracker's config instance only in EDITOR MODE, because its data will be updated only during the recording.
Public Fields:
List <FaceTrackerBlendshapeBind> blendshapes List of blendshapes binding settings ( each FaceTrackerBlendshapeBind contains the list of linked metrics, params etc.. )
FaceTrackerMetrics metrics You'll find here all metrics ( FaceTrackerMetric ). During recording, you'll be able to get the value of each metrics ( by "currentValue" field ).
EXTENDIBILITY
Two of the core features of Polyphemus are:
-Capture facial landmarks points.
-Transform these points into blendshape.
From points and blendshape values, you can build up several generic and/or specific 3D model related features.
For example, it's possible to implement a wrinkles map system, that change some normal map area intensity according to these blendshape values.
Or... make something happen when the upper point of mouth is near enough to the bottom nose point.
Or... force eye blinking pressing a button...
Or... hardcode some blendshape logics or constraints.
Or... why not, use points and/or blendshape values to drive skeleton-based 3D face model's bones.
To add this kind of features, you'll have to extends the FaceTrackerAddon ( it's a MonoBehaviour ) and attach it to the same GameObject containing the FaceTracker component.
In the package budle, there are included two Addon examples ( FaceTrackerAddonExample.cs and FaceTrackerWrinkles.cs ) that should be a good starting point to understand how it works.
FaceTrackerfaceTracker The parent FaceTracker component.
Virtual Public Methods:
virtual void Initialize ()
Override this method to implement custom initialization. Always call base.Initialize() to initialize the "faceTracker" field's reference.
virtual void EditorUpdate ()
This method will be called from the FaceTracker Editor each frame. Override this method to implement the addon's editor logic.
virtual void GUIRightBar ()
Override this method to implement GUI that will be drawn on the right bar of FaceTracker Editor.
virtual void GUIPreview ( Rectangle rectangle, Material previewMaterial )
Override this method to implement GUI that will be drawn on the preview area of FaceTracker Editor.
"rectangle" is GUI rectangle of "preview" area of FaceTracker Editor.
"previewMaterial" is the Material reference used to render mesh in the "preview" area.
EDITOR ONLY Methods:
virtual Component[] GetComponentsToRecord ()
Override this method return extra components references to record ( see FaceTrackerEyes.cs for example ).
To access to captured facial landmarks current points, use the FaceTracker points array: faceTracker.points
To access to captured current metrics, use faceTracker.config.metrics.[METRIC_NAME].currentValue
PERFORMANCE TIPS
FaceTracker Editor:
Reduce WEBCAM resolution ( 240p it's already enough ): From SETTINGS tab, change Webcam Width and Webcam Height.
Reduce Capture Fps from SETTINGS tab: Try 15 fps.
Disable both MESH and LINE preview in CAPTURE EDITOR.
Try to profile and/or disable all FaceTrackerAddon components attached to the gameObject.
During the recording, the framerate could decrease. Try to tweak the RECORDING FRAME DT on the right panel.
Unity:
Close temporarily the Inspector panel.
Try to run the game once.
If Editor profile reports a bottleneck on BeginPackageInitialization, please try to run the game once, and check if it solved the issue.
FAQ
Does it support skeleton-based expressions? Polyphemus capture system is based on blendshapes. It still possible, anyway, write a FaceCapureAddon that rotate specific bones from points and metrics data.
Does it need an external application? No, it works inside Unity.
Does it track also eyes movements? Eye tracking is not officially supported yet: There's an experimental addons included in the example.
Does it works like ARKit Remote face capture? Polyphemus use a single standard webcam. This limitation cannot guarantee the same result you'll get with a '3D' camera you have, for example, on an iPhone X.
While it can capture several expressions, there's some, like a puffy cheeks expression, that it's impossible to get with this system.
Does my 3D model need to follow a naming convention for the blendshape names? No, it's up to you. Also there's no guidelines about how many and which blendshape you have to implement. For complex models, you can follow this specs.
Is it possible to edit captured clips? Yes. Polyphemus outputs standard AnimationClips. So you can edit frames and curves from the standard Unity's Animation Editor.
It seems like it can't track properly parts of my face. Please check light conditions requirements. Also try to stay at 50cm / 1mt at 50cm from the webcam.
You're face must be inside a rectangle big at least 80x80, so if you set a low webcam resolution, you'll have to stay closer to the webcam.
Even if it can recognize a wide range of faces, it could have difficulties to detect some features in some kind of face and appearance.